Would you like to make this site your homepage? It's fast and easy...
Yes, Please make this my home page!
 current release VER. 3.3.60+
AK's Nifty Little Checkbook Calculator
If you're like me, and do all your checkbook maintenance
manually, then you might find that CheckBook.exe will
come in handy.

I've tried a money-management program (a cheap one that
came with my equally-cheap computer) but found I really
didn't have any use for it; I don't pay my bills elec-
tronically and surely don't want to pay for the expensive
printer checks that you need for those programs to print
your checks. I don't even write enough checks to make
that worthwhile anyway (thank God!).  I found that all
the software program was going to do for me was make me
transcribe all the data from the little ledger in my
checkbook to the bigger ledger in the computer program.
What I needed was a simple but convenient-to-use
calculator so I wouldn't be wasting my neurotransmitters
with simple arithmetic.

I tried various software calculators for doing my
checkbook but didn't find any that were what I thought
entirely satisfactory for one reason or another.
So naturally, I decided to make my own.

The current release of CheckBook.exe is just past it's
'beta development' stage and may still lack some necessary
error-trapping etc.  I've personally been using the
current version for months now and haven't run into any bugs yet...
which isn't to say it's exactly bombproof at this point though!
|
Features and Controls
Menu Functions
Reconcile Wizard
About CheckBook.exe
|
Features
- Multiple Accounts Capability
- Direct Debit/Credit Data Entry
- Scrolling Entry List
- Transaction Counter
- Password Protection
- User-Definable Constants
- Reconcile Wizard
|
Controls and Displays
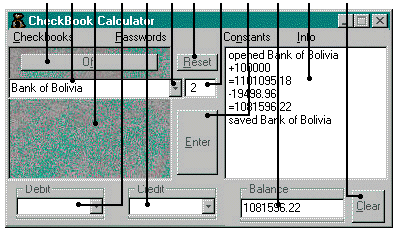
1 2 3 4
5 6 7 8
9 10 11 12
|
#1: 'Off' Button
Clicking on the 'Off' button or pressing the 'Alt' and 'F' keys on the keyboard will close the
program. Using this as opposed to the usual close window 'X' button will prompt you if you have an unsaved balance.
#2: Checkbook display
This is where your checkbook(s) are listed. It functions the same as any Windows drop-down
style Combo-box. This Combo-box display is used in conjuction with the 'click pad' (#3) and button
#6 to control your checkbook file access.
The 'Up arrow' and 'Down arrow' keys will scroll through the list.
The checkbook listed in this window is the active book or the one
that will become active on left-clicking on the 'click pad' or by pressing the 'Ctrl' and
letter 'O' keys on the keyboard.
CheckBook.exe will store any number
of checkbook names and balances. Checkbook names can be up to 30 characters in length.
#3: 'Click Pad'
A left mouse-click on the 'click pad' area or pressing 'Ctrl' and 'O' keys opens the checkbook
file selected in the Combo-box (#2). If you haven't stored a checkbook file yet, it opens one
named '1'.
Checkbook.exe handles multiple checkbooks. You must open a checkbook before you can
do any calculations with that checkbook!
A right mouse-click on the 'click pad' area or pressing 'Ctrl' and 'S' keys saves the checkbook
file.
#4 Debit Display
This is where you input your debit amounts. You can click on this box or cycle through the 'TAB'
stops to get here, or for more convenience just press the 'End' key while holding down the 'Ctrl' or 'Shift' key. Any amount in this box
will be subtracted from your balance (#10). Use the normal number keys (the typewriter keys or
Ten pad keys) to enter your numbers. The value in this box will be erased after the calculation
has occured.
This Debit display is a standard windows style combo-box just like the checkbook display (#2). The button on the
right edge of this display box will drop down the combo-box when clicked to allow selection of debit
constants [if any have been added and/or saved]. Just like the 'checkbook display' (#2), the PageUp and PageDown buttons will cycle through the constants.
#5 Credit Display
This is where you input your credit amounts. Operation of this box is the same as the Debit box
(#5) except it adds the amount to your balance and the quick-access key for this box is the
'Home' key (in combination with the 'Crtl' or 'Shift' key as with the Debit display box).
This display is also a combo-box like the Debit display (#4) and functions just the same for access to
Credit constants.
#6 Checkbook Combo-box Button
This button will 'drop-down' the Checkbook Combo-box (#2) so you can view or select from the
different checkbooks should you have more than one loaded. Any checkbook selected from the
drop-down box menu will be activated by 'Open' button (#3). The up and down arrow keys will also scroll through the checkbook list.
#7 'Reset' Button
Left-clicking this button resets the counter (#8) to zero and clears the counter display.
A right-click on this button clears the "Tape" (#11).
#8 'Counter' Display
Anytime you calculate a new balance from a debit or credit amount, CheckBook.exe counts the
transaction and displays the total in this box. This can come in handy if you have a long string
of debits and credits to calculate and want to make sure you haven't missed one.
#9 'Fix 2/Float' and 'Enter' Buttons
The Fix 2/Float button selects how Checkbook.exe interprets the dollar amounts in the Debit and Credit box while performing a calculation.
In 'Float' mode, all numbers will be interpreted for calculation just as they appear in the box [including as an integer when
no decimal is present in the number].
When [the default] 'Fix 2' mode is selected, any amount in the Debit or Credit box that does not have a decimal point
will be converted to a number with 2 decimal places for the purposes of the calculation [divided by 100, in effect]. In this mode [as with the 'Float' mode] any number with a decimal point will be interpreted as it appears in the box.
Clicking the 'Enter' button or pressing 'Alt E' will calculate your new balance based on the
amounts in the Debit and Credit boxes. For more 'adding-machine-like' convenience, either
keyboard 'Enter' key will perform the same function. With a ten-key equipped keyboard, transaction
information can be entered and computed rapidly by using the 'enter' key and the 'Ctrl' + 'Home' or
'End' keys to select between the debit and credit amount boxes.
#10 Balance Display
This box displays your current checkbook balance. Balances can be entered or changed manually
here or by entering amounts in the Debit and Credit boxes. Checkbook.exe will figure Debits and
Credits simultaneously if both the Debit and Credit boxes have values in them.
#11 'Tape' Display
All CheckBook.exe functions are written to the 'Tape' box giving you a step-by-step record of
functions and transactions entered into the program. You can scroll this box forward or
backwards at any time to check any data you entered or any checkbook file function you performed.
The 'Tape' will store up to 256 lines. Also, a right mouse-click on this display will open the pop-up
menu.
#12 Clear Button
Left-clicking the 'Clear' Button will clear the amount in the balance box and switch the function to 'Recall' which
will let you undo the clearing. Whenever there is a non-zero balance to recall the caption of this button will be italicized.
This function actually uses a memory to store the balance cleared and by right-clicking on this button you can cycle through the available functions
of 'Clear', 'Recall' and 'Swap' activated by a left-click to alter this memory and/or the balance.
Currently Operational Drop-down and Pop-up Menu Functions
To activate the pop-up menu right-click on any area of the CheckBook.exe
program window where there is not a control (this includes the 'click pad' control).
The 'Tape' display is the only display that a right-click will open the pop-up menu.
The same menu functions in the pop-up menu can be accessed through the menu bar at the top
of the CheckBook.exe window.
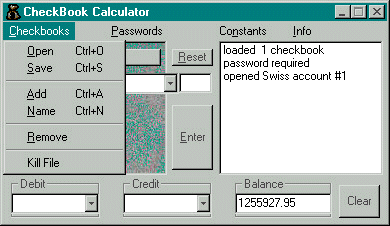
Additionally, the Drop-down Checkbook menu has hot-key access for 'Open' and 'Save' functions.
|
Checkbook functions
Password functions
Constants functions
|
To ADD a checkbook, simply type a name for the checkbook into the
checkbook combo-box (#2 in the Main Controls/Displays section).
Activate the pop-up or pull-down menu and select 'Checkbooks'
then click on 'Add' or press 'a'. Ctrl-A is also a 'short-cut' key for this function.
To NAME (or rename) a checkbook, select 'Checkbooks' then click on 'Name' (or press 'n'). Enter the new name in the message box. You can now save the checkbook with the new name. Ctrl-N is also a 'short-cut' key for this function.
To REMOVE a checkbook, select and open the checkbook you want removed.
open the pop-up menu selecting 'Checkbooks' then click on 'Remove' or press 'r'.
When you save the file, the checkbook will be removed from your file. For safety, there is
no 'short-cut' hot key for this function.
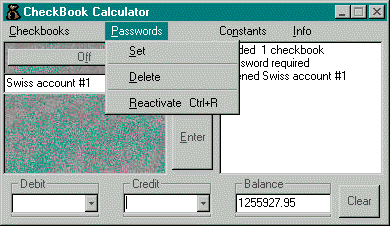
To SET a password, bring up the password menu and click on 'Set' or press 's'.
You will be prompted to enter a password. The password string can only be up to 8 characters.
Any characters typed after the first 8 are ignored.
As a safety precaution, there is no 'short-cut' hot key for this function.
To DELETE a password, open the password pull-down menu or the pop-up menu
and click on 'Delete' or press 'd'. Your password will be removed.
As a safety precaution, there is no 'short-cut' hotkey for this function.
To REACTIVATE a password, open the password pull-down menu or the pop-up menu
and click on 'Reactivate' or press 'r'. Your password will be reactivated and you will need
to pass the verification again before you can further access the checkbook.
There is no 'short-cut' hotkey for this function.
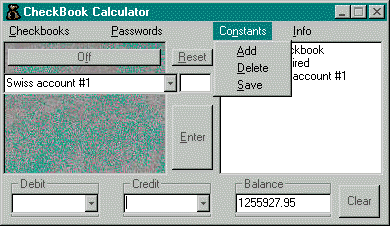
To ADD a constant you must enter the constant value into the appropriate Debit or
Credit box [note: checkbook.exe can add both Debit and Credit constants simultaneously] and click on 'Add'
in one of the 'Constants' menu boxes.
To DELETE a constant you must select the constant value in the appropriate Debit or
Credit box and click on 'Delete' on one of the constants menus. Changes, of course, must be saved to make
them permanent.
To SAVE the constants you must click on 'Save' in one of the constants menu. Note that changes will not become permanent until the particular checkbook itself is saved. The 'Save' function being determinent on both 'save' procedures allows you to create 'temporary' constants for a particular session without necessarily saving them as permanent constants. If you have done no transactions since the last time the checkbook was saved, you would have to use the 'Save' function on the 'Checkbook' menu to force a 'hard save' as the 'Click-pad' 'soft save' function is not set by a change of the constants.
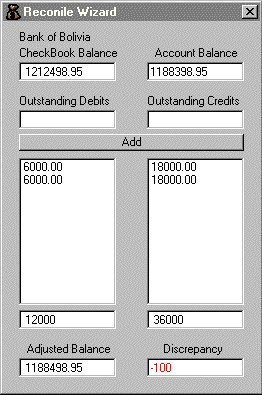
The 'Reconcile Wizard' is run by clicking on its item on the 'Info' menu or the pop-up menu.
The currently opened checkbook balance should be automatically transfered to this wizard.
Enter your bank statement balance in the 'Account Balance' box and any outstanding debits and credits in the boxes on
either side of the 'Fix 2/Float' mode-indicator label on the appropriate debit or credit column side.
note: the outstanding debit/credit boxes are the only ones controlled by the 'Fix 2/Float' mode. The Account Balance box
is always in 'Float' mode and a decimal point will have to used where needed.
The debit and credit columns will show you the amounts entered as well as the total number of entries and column totals at the bottom.
|
|
Clicking the 'Add' bar or pressing an 'Enter' key will update the display boxes.
Your 'adjusted' checkbook balance and any 'discrepency' value will be displayed in the boxes at the bottom.
|
Note: if the discrepancy value is negative then the account actually has less money in it than your checkbook indicates and you'd better figure out what's going on before you bounce a check!
Tool Tips may be toggled on and off with the 'Tool Tip' selection in either
the pull-down or pop-up menus. The tips are set to 'on' by default when the program starts
and toggle 'off' automatically when a checkbook file is loaded from disk.
CheckBook.exe
creates a [partially encrypted] file named "CB.DAT" in the same directory as the program to store
checkbook information. If you need to eliminate your checkbook files, just delete "CB.DAT".
The 'Constants' function also creates files with '.cbc' extensions for any checkbook that has had
constants added and stored for use.
Major and minor changes [apart from normal 'debugging'] to
CheckBook.exe
versions:
2.0.xx: Multiple account capability and password protection
3.0.xx: Programmable constants functions
3.1.xx: 'Reconcile Wizard' function
3.1.60: Enhanced 'Balance Clear' button function
3.2.xx: Added Calendar
3.3.xx: Added 'floating point/fixed 2' decimal function. The 'Reconcile Wizard' got a 'facelift' and counters
for the number of outstanding debit/credit entries. Fixed a major bug in the 'Calendar'.
Checkbook.exe program written by andykidd.
andykidd@yahoo.com
Technical support for the licensed version is available at the above email address.
The CheckBook.exe icon is Copyright 1997,1998 IGARASHI SUSUMU.
His current MOZCO icon website is:
http://www.tcp-ip.or.jp/~s-iga/icon/index.html
CheckBook.exe program and all related documentation ©1999 andykidd
one additional note: far-be-it from me to tell you how to configure your system; however, this
HTML document probably works best at minimum resolution of 800X600.